rainbow cupcakes

rc12.jpg

Rainbow cupcakes.

A little something I was very excited to try out and no better excuse than for a nice friend's birthday.

They are so fun!

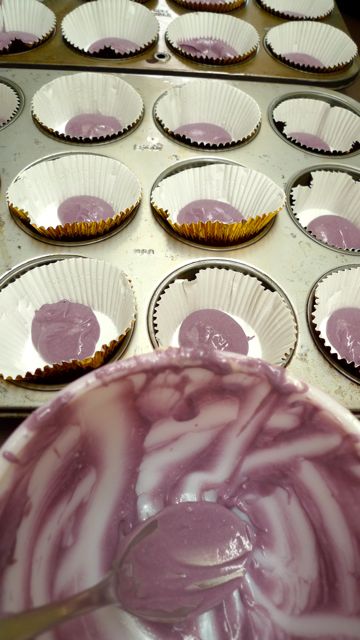
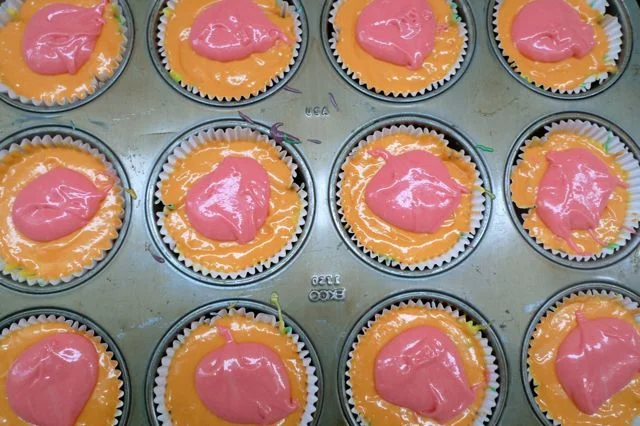
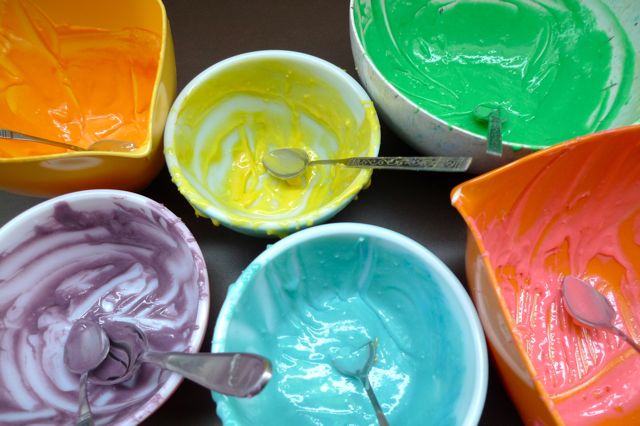
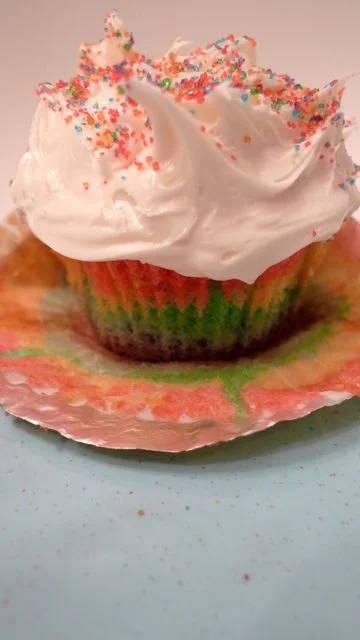
Knowing that layering colors of batter would be slightly labor intensive, I started with white cake mix and divided it into six bowls. Drops of food coloring made the rainbow colors.

Spoon a little of the colored batter into the cupcake cup and push to the edges. Repeat until your rainbow has been made. This is no easy task. I wasn't sure exactly how much to use and was slightly afraid that all six colors wouldn't fit. My cupcakes papers were VERY full. Next time I know to uses a little less.

I got a little lazy by the second tray and sort of left blobs of colors without actually spreading them to the sides. You know what? They actually came out just as pretty!

I frosted them with whipped white frosting and rainbow sugar.

Click on the photos below to see the process:

pear cranberry hand pies

Warm, golden, flakiness, and oh so B-U-T-T-E-R-Y!

Saw this recipe in this month's food and wine.

Although it says hand pie, it uses puff pastry, which makes me call this more of a turnover.

Call it what you will.

I love the sweetness of the pears with the tartness of the cranberries and a hint of holiday spice.

Since you skip out on making crust these are super easy!

I didn't exactly follow directions. Poor measuring on my part made for 9 not-so-square sqaures.

My rushing a little also made for them to be not so perfectly sealed but in the end it all worked out deliciously.

rice krispies treats disguised as ghosts!

gk9.jpg


My Halloween spooky sweet this year was to wrap a rice krispies treat like a ghost! They are so easy to make: just form your treat into a ball, insert a 'cookie stick', and dress them up!

Here's what to do:

gk1.jpg

First, tear about 8 inches of white wax paper from the roll. If you are making a whole batch into ghosts you will need 18 pieces.

Use the original recipe to make the treats (I tend to add a bit more butter and mini marshmallow).

Coat your hands with butter and form the mixture into a ball that measures approximately 2-2.5inches in diameter.

Insert a cookie stick (can be found at a baking/candy making supply store or Michael's has them in the baking section. A popsicle stick will also work, but cookie or lollipop sticks are white!) and press the ball firmly around it.

Place on wax paper sheet and repeat process for the rest of the batch. You will need to work quickly and constantly coat your hands with butter or it will be a sticky mess!

gk10.jpg

Wrap each treat in the wax paper, twisting tightly around base and perhaps even using scotch tape to keep sealed. Trim off excess paper.

gk3.jpg

Next, cut pieces of white fabric roughly 11 x 14 inches. I used organdy which is stiff and can hold its shape well and then topped with an equal piece of white tulle. I was really pleased with how this combo turned out but I'm sure any sort of white fabric would be just as cute.

gk4.jpg

Wrap the fabric around the treat and tie loosely with string of your choice. I used orange yarn for a little color.

gk5.jpg

Time for some googly eyes! Boo!

gk6.jpg
gk7.jpg

Wrap up all your treats. Fun!

gk8.jpg


I love that they are on sticks which makes eating them a slightly neater experience. Perfect as party favors!

halloween peanut butter and toffee candy bar bark

No, I did not attack our halloween candy stash in a late night binge. In fact, we don't get any trick-or-treaters so I don't even buy any candy for them.

These candy wrappers are a part of something far greater than 'just halloween candy'.

This was for a recipe I saw in the October issue of bon appetit.

You know how food magazines and television cooking shows offer you loads of ideas for what to do with your Thanksgiving Day leftovers? I feel like whoever concocted this recipe said to themselves, "What are we going to do with all of this leftover Halloween candy? (lightbulb goes off) I know! We'll crush it all up and throw it on even more melted chocolate and call it bark!"

One heck of an idea.

One pound of bittersweet chocolate morsels melted, 3 Heath bars, 3 Butterfingers, 8 Reeses Peanut Butter Cups, 1/4 C of honey roasted peanuts, 3 ounces of white chocolate to make it look pretty and as if that's not enough, topped with Reeses Pieces AND/or peanut M & M's for festive color.

Unwrap. Destruct. Melt. Assemble. Melt. Assemble more. Chill. Destruct. Serve. But please, don't eat it all yourself.

maple-apple upside down cake

Found this recipe while flipping through the new Food & Wine. Using my east coast maple syrup and some west coast apples I prepared this cake fit for an elf. All joking aside, it's actually a lovely cake that glows like autumn sunshine.

apple-cake4.jpg

mushroom cupcakes

mushroom-cupcakes

mushroom-cupcakes

I made mushroom cupcakes for the party.  Edible table decor!

For the cake I used Martha Stewart's yellow buttermilk cupcake recipe, which I had used once before and they were amazing. I decided to make these the day before to save time and to be honest, they were a little dry. Ok, very dry. (Maybe my storage method wasn't exactly airtight.) But they looked really cute! We just ate the tops. Anyway, any white or yellow cake would be fine. I used unbleached kraft cupcake liners as the mushroom base.

Something I learned from this project is how hard it is to achieve true red frosting.  I was about to give up on my pinky color when I realized if I dipped the cupcake in red sugar, pink was transformed to a lovely red! Yay! I piped on the white dots. Viola!