rice krispies treats disguised as ghosts!

gk9.jpg


My Halloween spooky sweet this year was to wrap a rice krispies treat like a ghost! They are so easy to make: just form your treat into a ball, insert a 'cookie stick', and dress them up!

Here's what to do:

gk1.jpg

First, tear about 8 inches of white wax paper from the roll. If you are making a whole batch into ghosts you will need 18 pieces.

Use the original recipe to make the treats (I tend to add a bit more butter and mini marshmallow).

Coat your hands with butter and form the mixture into a ball that measures approximately 2-2.5inches in diameter.

Insert a cookie stick (can be found at a baking/candy making supply store or Michael's has them in the baking section. A popsicle stick will also work, but cookie or lollipop sticks are white!) and press the ball firmly around it.

Place on wax paper sheet and repeat process for the rest of the batch. You will need to work quickly and constantly coat your hands with butter or it will be a sticky mess!

gk10.jpg

Wrap each treat in the wax paper, twisting tightly around base and perhaps even using scotch tape to keep sealed. Trim off excess paper.

gk3.jpg

Next, cut pieces of white fabric roughly 11 x 14 inches. I used organdy which is stiff and can hold its shape well and then topped with an equal piece of white tulle. I was really pleased with how this combo turned out but I'm sure any sort of white fabric would be just as cute.

gk4.jpg

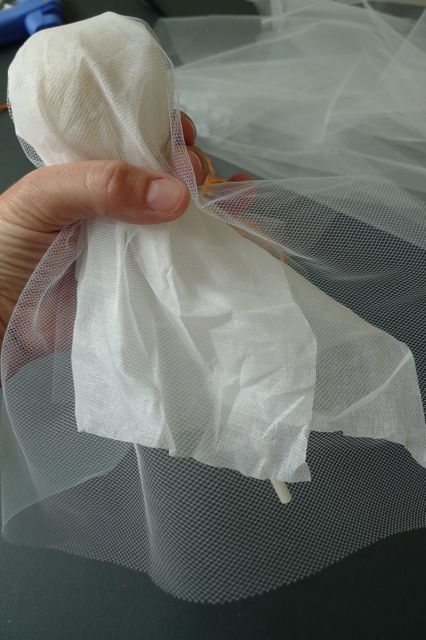
Wrap the fabric around the treat and tie loosely with string of your choice. I used orange yarn for a little color.

gk5.jpg

Time for some googly eyes! Boo!

gk6.jpg
gk7.jpg

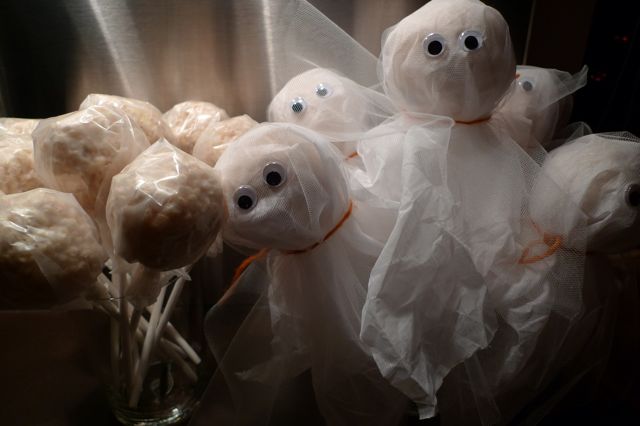
Wrap up all your treats. Fun!

gk8.jpg


I love that they are on sticks which makes eating them a slightly neater experience. Perfect as party favors!

halloween peanut butter and toffee candy bar bark

No, I did not attack our halloween candy stash in a late night binge. In fact, we don't get any trick-or-treaters so I don't even buy any candy for them.

These candy wrappers are a part of something far greater than 'just halloween candy'.

This was for a recipe I saw in the October issue of bon appetit.

You know how food magazines and television cooking shows offer you loads of ideas for what to do with your Thanksgiving Day leftovers? I feel like whoever concocted this recipe said to themselves, "What are we going to do with all of this leftover Halloween candy? (lightbulb goes off) I know! We'll crush it all up and throw it on even more melted chocolate and call it bark!"

One heck of an idea.

One pound of bittersweet chocolate morsels melted, 3 Heath bars, 3 Butterfingers, 8 Reeses Peanut Butter Cups, 1/4 C of honey roasted peanuts, 3 ounces of white chocolate to make it look pretty and as if that's not enough, topped with Reeses Pieces AND/or peanut M & M's for festive color.

Unwrap. Destruct. Melt. Assemble. Melt. Assemble more. Chill. Destruct. Serve. But please, don't eat it all yourself.

make something: giant pixy stix magic wand

star9.jpg


This is a fun and easy project.

This magic wand was made for a certain sweet little halloween witch.

Change the colors for princesses or birthday party favors!

When you're all done making magic you can eat your wand.

Follow the pictures to see how it's done. I found that foam board makes a better star than cardboard as it is less likely to warp with the glue.

found: vintage felt boot for your scissors

There they sat on a shelf: three hand crafted felt boots embellished with fancy trim and old buttons. They were all different with one exception; in each boot was a pencil drawn pair of scissors on construction paper. The construction paper was faded and crunchy like the first mother's day card you made a long, long time ago stored away in box up in the attic. I was glad the drawing was in there. How else would I have known what this fancy felt boot was for?

My imaginary story for their creation goes as follows:

Once upon a time there was a cute and crafty grandma who had always longed to be a high fashion shoe designer.

Alas, her life didn't go quite as she planned.

One day she searched for her special fabric scissors, the ones she always told her ten grandchildren, "Please never ever use these scissors to cut paper  or any other thing besides fabric or ribbon in order to keep their blades nice and sharp!"

Then she found them. They were jammed in the pencil jar. Oh dear, she thought, I must make these scissors a special case so that everyone who sees them knows that they are special scissors. She thought about what she should make and then it came to her. Of course! She would design lovely, embellished high boots like the ones she always dreamt of creating except these would be made out of felt and she could use all of the buttons and trims she had collected over the years to give them extra flair.

She was so pleased with herself. She showed her cute little grandma friends at her crafting club and they all convinced her she MUST make these and sell them at the next bazaar because surely others needed to protect their special scissors too! As for the scissor drawings? Well, she asked one of her grandchildren, the one who liked to sketch and use the fabric scissors to cut out her paper creations, to draw pairs of paper scissors for her to place in each boot.  Together they sat at the bazaar and sold all but three of their felt boot scissor holders. It was quite a success.

How lucky for me that I now have one, too!

maple-apple upside down cake

Found this recipe while flipping through the new Food & Wine. Using my east coast maple syrup and some west coast apples I prepared this cake fit for an elf. All joking aside, it's actually a lovely cake that glows like autumn sunshine.

apple-cake4.jpg