eggs in the nest

Last March I began my search for different types of blown-out eggs to put in a nest on our coffee table. I thought it would be a great way to teach the little miss about birds and hatching. So far in our collection we have eggs from an ostrich, emu, chicken, duck, goose, and quail. Clementine likes to pick them up and feel how smooth or textured they are; she is very good with them, realizing their potential fragility.  I made some flash cards with pictures of the birds and their babies. We match the egg to it's appropriate picture, talk about where the bird lives, what sounds it makes, how big they are, and other observations, and then thanks to you tube we can watch these birds hatching from their eggs!  I thought putting out our nest of eggs every year would make for a fun spring tradition. 

nest5.jpg
nest2.jpg

our leprechaun trap is set!

lt8.jpg

Before the little miss went to bed tonight she set up her leprechaun trap that she made. A leprechaun trap?

Yes. A leprechaun trap.

What will we do if we catch a leprechaun?

Well, make him tell us where he's hidden his gold, of course!

All of this stems from a book we've been reading called The Night Before St. Patrick's Day by Natasha Wing.  To be honest, I had never heard of all this trickery and leprechaun catching before, but I sure do like it. It's so fun!

We decided to model our trap after one we saw in the book which uses an empty tissue box. I covered it and let Clementine decorate it with things leprechauns like: green, shamrocks, rainbows, and gold! I made a little ladder and we covered the hole with a piece of tissue paper and set two gold coins on top to hopefully lure in a little leprechaun. If he's not careful, he'll fall in the hole and we'll catch him!

I can't tell you how many times Clementine has walked her little fingers up the ladder making a "doo-dee-doo" sound and then plops her hand on the coins and into the hole. Then she laughs a hardy laugh. Or how many times since Tuesday, when we made this trap, that she's checked to see if a leprechaun was in the box!

P.S. check out the BEST leprechaun trap! A cake!

potato stamping {for St. Patrick's Day}

potato1.jpg
potato21.jpg
potato3.jpg
potato222.jpg

What better a time than St. Patrick's Day to introduce potato stamping to the little miss? I just sliced the potato in two, and instead of making my own shape by carving (we'll do that when she gets older), I found another use for my little shamrock cookie cutter. I pushed it into the potato and cut around it. Simple.

She was very entertained as she dipped the potato into the paint and with her whole hand clasped tightly to the spud she pounded the paper. More of a "stomp" than a stamp. It was fun.

stamp.jpg

rainbow rice {st.patrick's day style}

rice-header.jpg

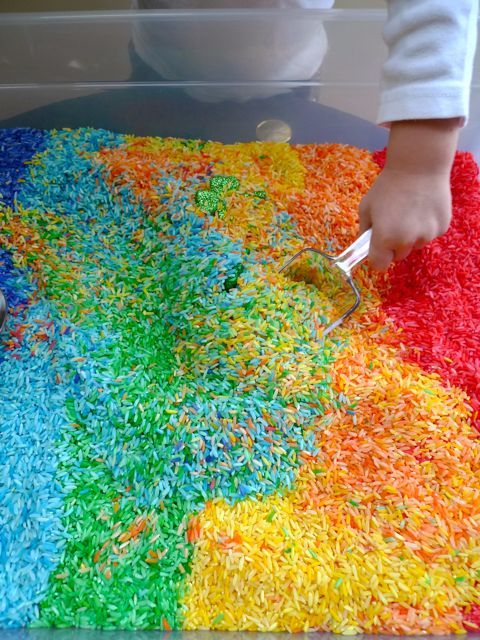
Rainbow rice. An amazing sensory play project that I have been waiting to do with the little miss. I first saw it when I was pulling together ideas for her rainbow sprinkles birthday party. I wanted to wait and introduce it at a later time. I figured St. Patrick's day was a great time to learn about rainbows and leprechauns! And with the gray weather we've been having, I need to see rainbows now more than ever!

Originally, I imagined this as a super fun St. Patrick's Day party activity. Then I had a vision of two overly excited two-and-a-half-year-olds flailing rice all over my house and well, I chickened out!! I still made two boxes of rainbow rice, but the girls could enjoy them on their own. (I can hear my own mother laughing out loud right now.)

I started with a 25lb bag of rice. This was exactly enough for 8 cups of each color of the rainbow. Coloring the rice is very easy and I was surprised at just how fast it went.

rice1.jpg

I put the 8 cups of rice in a gallon size ziplock bag. Next, 1-2tbsp of alcohol, which helps set the color, and as many liquid food coloring drops as needed to achieve the color desired. I started with 25-30 and increased it from there. Seal the bag and toss the rice in the bag until the color is distributed. Easy as that. Empty the bag onto a cookie tray to dry.  The smell of the alcohol will go away as the rice dries.

Now to fill the boxes! I wanted something big enough for enjoyable play with funnels, buckets, etc., but not too big, I decided on 28 quart clear boxes with lids for easy storage. They measure 23" x 16 1/4" x 6". It worked out PERFECTLY for the 28 cups of rice I put in it (4 cups for each of the 7 colors of the rainbow). Enough rice to play with and have fun, but not too much to overflow into the house. Totally ideal for toddler size!

rice4.jpg

As I put each color in, I would push it towards the last color to make each color about 4" in width. Doesn't it make you smile?

rice6.jpg

To introduce Clementine to the fun of St. Patrick's Day: leprechauns, rainbows, shamrocks, and a pot of gold, I bought some golden coins and glittery shamrocks to hide in the rice.

rice7.jpg

I hid 6 shamrocks and 12 coins in each box.

rice8.jpg

I simply pushed them into the rice. Buried treasure in the rainbow! I told her all about leprechauns and I read her a little Irish poem that I had found. We talked about how tall they were, what color they liked to wear, and about their mischievous ways. And of course how they say they like to hide their treasure at the end of the rainbow! Next came the colors of the rainbow (I went with the classic ROYGBIV, she'll have to learn it eventually, right?!) As much as she thought all of this was so cool, all she really wanted to do was get her little hands into that box of rice!

rice10.jpg
rice-colors-mixing.jpg
rice-coin.jpg

She was very excited to find the coins and shamrocks. When they were all found she played for a VERY long time. Yes! I love a successful project. Will I be finding rice all over my house forever? Probably. But, I think it's worth it.

This is what the box looks like now...

rice-rainbow.jpg

handprint masks for mardi gras

photo-13-1024x1024.jpg
photo-12-1024x1024.jpg
photo.jpg

A mask seemed like a perfect mardi gras activity for the little miss.

I showed her where New Orleans is on her favorite map puzzle. We listened to brass band music and talked about the festivities. She was super excited to get her beads in the traditional colors of purple (for justice), green (for faith), and gold (for power). We used these same colors to make our masks.

I traced her hands, one on purple paper, and one on yellow paper. I cut them out and glued them together at the palms and then to some cardboard (cereal box!) to make them a little sturdier. Next came the eye holes. The rest was up to Clementine. She glued feathers, drew with markers, and poured some gold glitter. It was a quick and enjoyable activity!

hand.jpg

I wound a gold pipe cleaner around a wooden skewer (with the point taken off) and taped it to the back of the mask. Lastly, three gold ribbons tied to the top.

Tonight we'll feast on jambalaya and king cake. Having an excuse to celebrate all sorts of holidays is definitely one of my favorite things about being a mom!

best friend pasta necklaces

NNN.jpg

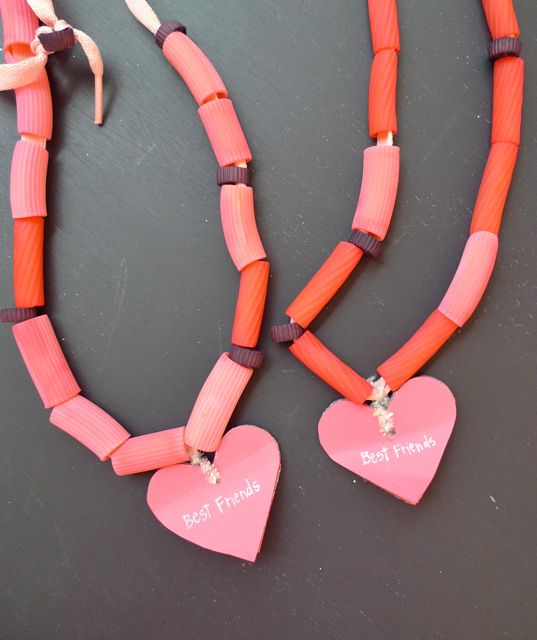
Pasta necklaces are so fun! What makes them even better? (Pretend this question is being asked to a two and half year old girl obsessed with pink) Well, when the pasta is pink, of course! I thought it would make them even more special to have a "locket".

The girls LOVED this!!!

First off, coloring the pasta.

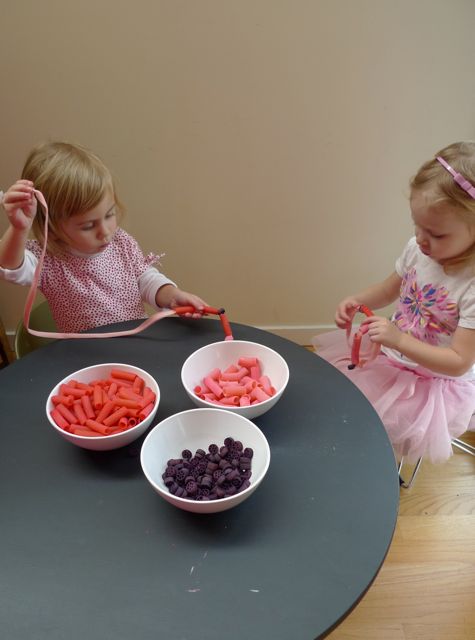
Put the pasta in a ziplock bag with a tablespoon of alcohol and 4+ drops off food coloring (depending on how dark you want your color, enriched pasta requires a few more drops of color). Shake it around until it is all coated. Place on tray to dry.

necklace-past-color.jpg
necklace-pasta-dry.jpg

Repeat this step for as many colors or types of pasta you want to use. Shoelaces make for the perfect string for the younger set. I cut one in half so each had the flugelbinder (yes, that is the name of the shoelace tip; impress your friends with that fun fact.) to use to ease in stringing the pasta. I tied a wagonwheel at the other end with a knot.

necklace-heart2.jpg

As for the locket, I cut a heart shape out of a sturdy piece of cardboard. For best results do not use corrugated cardboard as it bends too easily. I traced the heart shape onto pink paper and cut out three more hearts. One to cover the front, one to cover the back, and the third I glued just the top part down on the front, to make a sort of flap so you could "open" the locket. I punched a hole to string it on the necklace, and I glittered the sides to cover up the cardboard. After all was dry, I wrote "Best Friends" Lastly, I cut out pictures of the girls' faces. Two of each.

necklaces...1.jpg
vday-makingnecklce1.jpg
necklace-3.jpg

After the girls were done stringing, we tied a knot to make the necklace complete. Then we sat down with the pictures and a glue stick. We asked the girls to pick out the picture of their best friend, they did, and then picked out the picture of themselves. We glued the cute little faces under the flap, inside the "locket" and using a piece of sparkly pipe cleaner, attached it to their necklace.

necklace2.jpg

"Awww, so cuuute," Clementine said as she raced to see herself and her new homemade necklace in the mirror. Yes, indeed.

hearts and crafts: the very pink valentine celebration

vday-table-left2.jpg
vday-heart-cookies.jpg
vday-tableright.jpg
vday-necklace-supply.jpg
vday-lovebite3.jpg
vday-dress.jpg
vday-table-left-with-eggs.jpg
vday-puttingvalentinesin-frog.jpg
vday-hopping-like-frog.jpg
vday-pond.jpg
vdaycccc.jpg
vday-readingvalentines.jpg
vday-weez.jpg
vday-monket.jpg
vday-adshomemadev.jpg
vday-makingnecklce.jpg
vday.jpg
vday-.jpg

The little miss had her best friend, Addie, over for a pink valentine celebration. Pink cupcakes, candy, hearts, cookies, valentines, balloons, tissue paper flowers, even hard boiled eggs! There's a small part of me that hopes if I just bombard her with pink she will decide to rebel and like another color; until then, I put on my very pink, vintage, bedazzled dress and a big smile.

The valentines were placed in the froggy 'mailbox' that I had made out of a box, some green wrapping paper, and some extra large google eyes. Before the girls could open them, they had to hop like frogs on the hearts, jump or swim across the pond of bubble wrap (who can't resist popping those bubbles?!) and slither like a caterpillar or snake under the streamers. It was lots of fun. They did it quite a few times before opening their home made valentines and then about thirty more times after! They managed to squeeze in a few bites of their heart shaped pb&j's, munch on a few cookies, and lick the pink frosting off of a cupcake or two.

Then it was craft time. Pink pasta necklaces with a paper "locket" that I had written 'best friends' on. This was a big hit! After stringing the pasta, the girls pasted their pictures inside the heart. They loved it! Look how happy they are as they checked out their necklaces in the mirror. I love that pure joy!

Even weezie, our brussels griffon, had fun at the pink party. Although, I'm sure she's quite happy to have the bubble wrap pond off the floor today. Me too!

Details on the pasta necklaces and 'love bite' cookies to follow...