home made {ballerina} bird feeder

bf13.jpg

We spent our holidays visiting family on the east coast; there were festivities, friends, merriment, and germs. The little miss picked up a virus which made for a very sad new year's celebration. It's amazing to think that something so cute can be so germy and contagious. The cold has spread to everyone and we are a bit house bound at the moment. I'm going a little stir crazy.

It's been difficult mustering up the energy to play house with Clementine, which is what she always wants to do. "Be the mama!" she insists. "Okay," I respond picking up the mama doll, "Mama is very tired and she's going to lie down in bed."

"No! Be the mama!" she demands again.

I needed to find an alternative that didn't involve lying on the floor which made me want to sleep.

What to do, what to do?

A bird feeder!

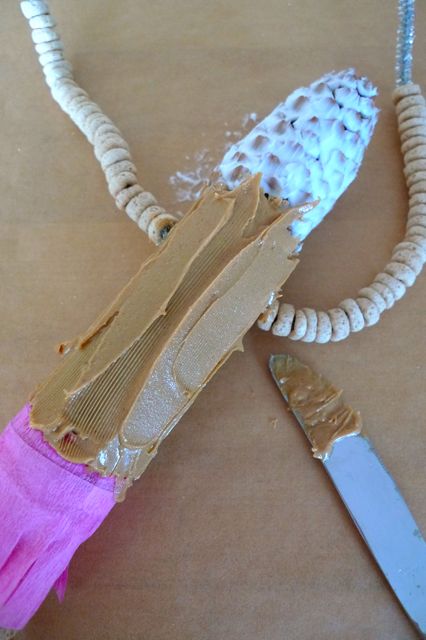
The old fashioned kind with a pine cone and peanut butter (ah, enter a nostalgic sigh!) would be a fun activity and then we could watch for birds after; bird watching is one of my favorite things to do upstate.

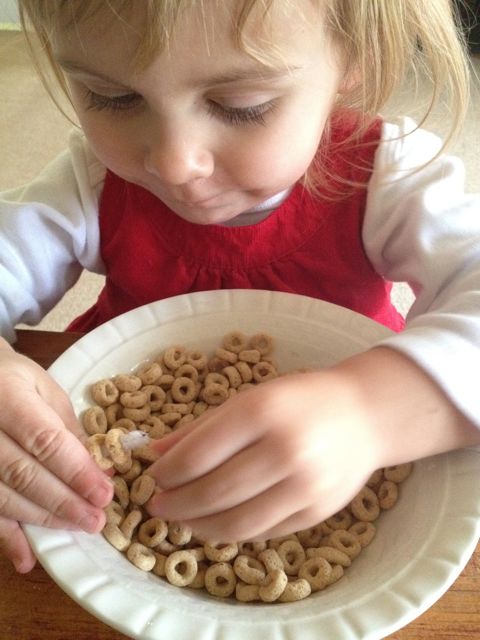
I googled and found all sorts of home made bird feeder ideas. Stringing cheerios on a pipe cleaner was the easiest option, but then I found the recycled toilet paper roll. Hmmm, maybe we could combine all three.

So we did.

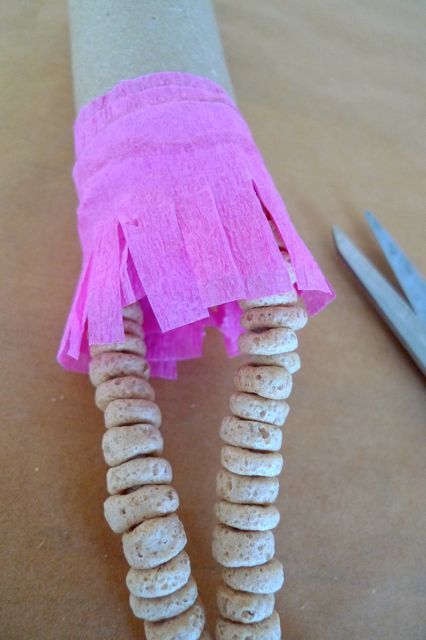
It didn't start out with the intention of being a ballerina. I had grabbed a roll of pink crepe paper and once we strung our cheerios on the pipe cleaner, an activity that was VERY fun for the little miss and she thought it was really cool that birds would enjoy eating the same cereal as she did, and kind of assembled all of the things together I realized that it looked a lot like a ballerina; a very tall, long waisted, dangly, skinny legged ballerina. Blame it on the cold medicine, but it's pretty darn funny.

The heart was a last minute addition, maybe it would make a good home made valentine gift!

Click on the pictures below to see the step by step. It's really simple. You could adjust it to fit the needs of whatever supplies you happen to have on hand. If you have peanut allergies you can use crisco or some other vegetable shortening. I used both just to see, and they both worked great.

We used:

empty toilet paper roll

pine cone that we found in the yard

4 pipe cleaners

hole puncher

crepe paper

scissors

hot glue (for the crepe paper skirt and to hold the pine cone in place inside the tube)

peanut butter/ crisco

bird seed

construction paper heart

The birds seem to like it and Clementine squealed with delight to see them eating the seeds off our creation!

making a snow globe with a toddler

snowglobe11.jpeg

The little miss has been fascinated with snow globes this holiday season. I thought it would be a great thing to make at the craft party. (Yes, it was just the two girls, but I still like to refer to it as a party.) There are many how-to's out there and they all seemed to vary from using aquarium glue to screw on the lid and go. As much as I love the sparkling falling snow floating slowly upon the trees there was one thing that was holding me back: water! These are two year olds, any element that could lead to disaster that I can omit, well, I'm all for it. That's why I was delighted to come across tidy mom blog and her instruction on waterLESS snow globes. How perfect! Here's what we did:

We started with a large baby food jar. Cut out a circle of felt and hot glued it to the lid.

Next, we had the girls choose a character from the selection of little christmas ornaments I found at Michael's. Clementine chose the snowman named Frosty, to her EVERY snowman is Frosty, and Addie chose Santa. Each picked out a tree that I found already sparkly and decorated with beads. While they played with the extra ornaments, making them dance and "ice skate" on the table, I attended to the hot glue gun.

First the tree was glued down. I took a sparkly pipe cleaner and rolled it into a little ball and glued it to the lid next to the tree. This would help to prop up the characters so they didn't sit so low, I glued the snowman right to the pipe cleaner and a little glue on its back to hold it to the tree.

We had the girls pick out some other things to include in their snowglobe like a pom pom for a big snowball and a sparkly snowflake. These were both glued in place. Now the fun part:

I really did let two two year olds pick up a hand full of fake snow and then shake their own glitter into the jar. I was nervous, I can't lie. At one point the lid on the glitter opened more than I wanted it to and glitter went EVERYWHERE! Thank goodness I covered our work space with paper to help with the clean up. I'm sure our house will be sparkling in places well into summertime. It was worth it!

We put our lid on and turned the jars over. Almost done!

I glued a soft sparkly trim to cover the lid and deter tiny hands from unscrewing. Shake it up and watch it snow!

Clementine has showed everyone who's come over to visit. The perfect snow globe for toddlers!

handprint rudolph

rudy6.jpg

Once again I searched for some holiday craft ideas; this is one that I found. It's a pretty simple concept and it helps that the little miss is just slightly obsessed with Rudolph. So all in all, a perfect idea for the younger set.

rudy3.jpg

I find that it helps to have all the components of the project together in a sort of craft pack. In this case, a plate worked just fine. It keeps everything at hand and it's fun for the little ones to see all of the different parts that will make up their final project. You can talk about them, "hmmm, what do you think this red pom pom will be? An eye? No! That would be funny."

rudy2.jpg

This is what we used. I have a thing for google eyes, definitely not necessary, nor is the bell, but I thought it would be fun. You could just use red glitter and some glue to make a shiny nose instead of a pom pom, or even put brown glitter on the 'antlers' or use a flocked paper. It could be as simple as you want it to be. There are so many ways to tweak it.

rudy1.jpg

Trace each hand and cut out.

I like the hand print projects, when the kids get older they can look back and see how tiny their hands once were. Paste the 'antlers' on the head, either on the front or back. Add some eyes, a shiny nose and a mouth. The girls aren't using glue on their own yet, in fact Clementine put it on her lips like lip gloss, bad idea! So, we just asked them where everything went and attached it for them. Draw on a mouth...Addie wanted Rudolph's tongue to be sticking out. Why not?! A jingle bell tied on with a gold pipe cleaner was the final touch.

rudy5.jpg

My favorite part is how proud the girls are of their work!

let the holiday craft party begin!

Whoo Hoo! Put on your tutu and lets have some fun!

The girls got together for their holiday crafting and merriment extravaganza.

On the agenda: donut hole snowmen, rudolph, snowglobes, and silliness.

It was quite a success.

Present wrapping, the busy post office, and cookie baking are calling me right now, but I will post details of each project later on tonight! What fun

party1.jpg
party7.jpg
party2.jpg
party5.jpg
party3.jpg
party6.jpg

graham cracker cottages in a marshmallow world

snowman4.jpg
snowman1.jpg
snowman3.jpg

I really wanted to make a gingerbread house with the little miss this year.

The problem? Well, I didn't want to start with an already made kit that you just assemble and with my ever growing cookie-to-bake list I didn't want to make it myself.

Then I discovered graham cracker houses.

Where have I been? I'm convinced I've never seen this idea before until I googled holiday crafts to make with your toddler.

My babysitter (who is 15 years younger) tried to convince me that we made them in school. Ha! Did 'we'?! I don't remember that.

Anyway, countless pictures and instructions are available just a few clicks away.

I'm really into the small scale and although Clementine's two year old hands couldn't assemble a cottage, she was very happy to decorate the roof with peppermints and make a snowman out of mini marshmallows all while singing her rendition of Frosty.

Putting our sweet, snow covered houses in the punch bowl seemed like a great way to contain them in our own little snowglobe.

I filled it with giant marshmallows and then mini marshmallows (are you singing 'It's a marshmallow world in the winter when the snow comes to cover the ground... It's a time for play, it's a whipped cream day... I wait for it the whole year round' ???  I am.) put in our cottages and then sprinkled with coconut. A gumdrop snowman and peppermint walkway were the final touches. Oh, and of course the string of star 'lights' across the top, for this is a festive peppermint town!

It's simple and not perfect, and that's what I love about it.

As for the mini marshmallow snowman that Clementine made? She ate it, of course!

turkey hat day

Clementine and her friend, Addie, had a little turkey party yesterday. On the agenda: turkey hats, "turkey" snacks, turkey cupcakes, and a whole lot of gobbling.

IMG_3323.jpg

Oh, turkey hats!

I searched online for some inspiration and came up with this.

The real feathers are my favorite part!

feathers.jpg

I had all of the pieces cut out and ready to glue. Since the girls are only two there is only so much crafting they can do.

They showed us where the google eyes and beak would go on the turkey face and then carefully chose each feather and placed it on the turkey body for us to tape down. Afterwards, I hot glued a piece of brown paper over the feather tips to cover all of the tape. The sides were stapled together at the appropriate head size and then red wings were glued over the staples to hide them.

turkey-hat1.jpg

g o b b l e .  g o b b l e.

turkey-party.jpg
turkey-2.jpg

And for the snacks?

Well, it wouldn't be a true craft party without some reference to Martha! Thank you, Sara Westbrook, for coming up with this clever idea as featured on Martha Stewart. Check out this link to see how it's done. It is VERY easy and so FUN!

turkey-party2.jpg

No, I didn't make them.

Cupcakes were not on my list. You (I) can't do everything! These bright little guys caught my eye in the Whole Foods bakery display. Perfect finale for our turkey party!

make something: A-Z necessities for the new parent. Words of wisdom and keepsake book for the baby shower.

*

*

We had an alphabet theme for my sister's baby shower (in case you haven't caught on to that by now!).  One day, while at Michael's, I came across a made-for-teachers bulletin board alphabet with green polka dotted trim. It was super cute and I liked the idea of bringing it back to elementary school and learning to write. Especially since my sister is a teacher. I wasn't sure exactly what I was going to do with it when I purchased it but then it came to me.

I was going to make a book!

A book where guests can share their wisdom with the new parents in an A-Z format.

It is not only a great activity for the guests but a keepsake for the new mama.

Here's what I did:

Cut out each letter and pasted it onto a piece of lined writing paper, color photocopied each page to make it seem more finished otherwise the heavy cardstock of the letters was to weighty for the lined writing paper, made a front and back cover which I laminated, and then had the whole thing spiral bound. Pretty simple.

On the back page we all wrote in our name and our guess for the baby's birth date and weight.

I think it was a pretty good idea!

A lot of times a shower invitation will contain a card that asks you to write something and bring it with you to the shower. I always forgot mine. Doing it right at the party seemed like a better idea. It's simple one word or short sentence format makes it an easy thing to do even as the presents are being opened.

Two other variations of this would be:

A photo book for a more finished version. Take pictures of all 26 letters, maybe from signs that you see around town or even from books or stencils. Make a photo book online putting only the letter photograph on each page and leaving the rest of the page blank for writing. You could mix in prego pictures of the new mama or the happy couple. Or even photos of the couple from when they were a baby!

Or for a more home made scrapbook feel, just paste letters to a pre-bound white page sketch book or small scrap book, heck, even blank pages in a three ring binder would do the job!

Pass it around and see just how clever your guests are!