weezie the elf
This year's Weezie ornament...
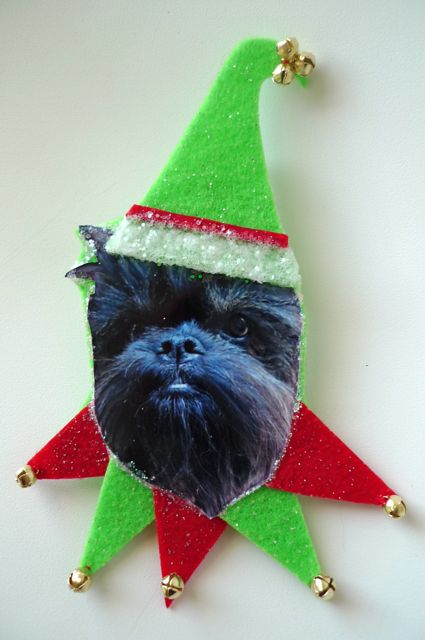
This year's Weezie ornament...
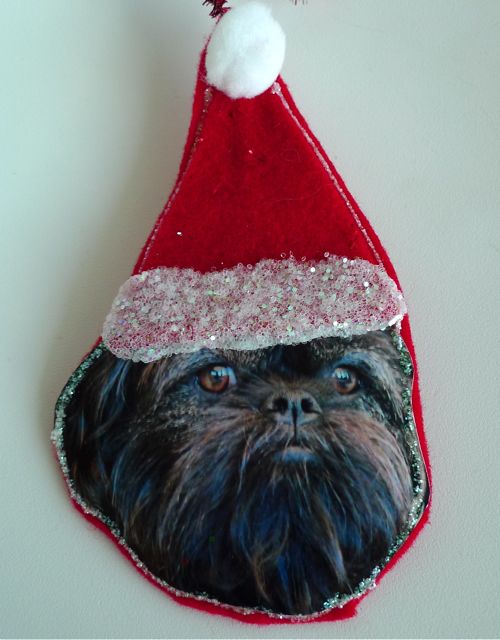 santa weez
Every year I make an ornament transforming our beloved furry friend, Weezie, into a holiday favorite. The first year I got a little carried away with how many I made and santa weez covered our tree. It was quite a sight! Oh what a photo, felt, chenille stems and some glitter can do! It makes us laugh every time.
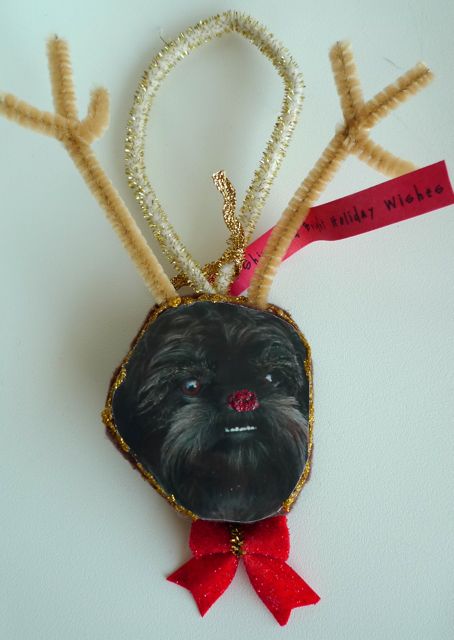 weezie the red nosed reindeer
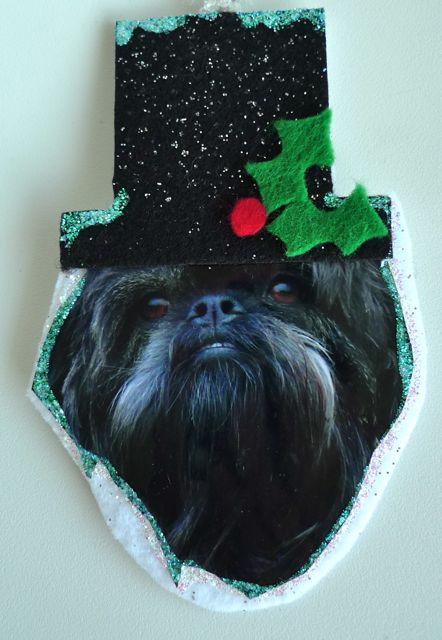 frosty the snow weez
What will she be this year? Check back tomorrow to find out!
 I thought it would only be appropriate if Clementine was an owl for her first Halloween. A magical colorful owl! That's the best part of making your own costume, you can make it anyway you want! I needed this to be as easy and simple as possible which meant NO SEWING! With my trusty hot glue gun and some colored felt, I sketched out my idea and got to work.
I folded a yard of brown felt in half and marked the shape of my owl body by using one of Clementine's pajamas as a guide for shoulder width and overall length. I cut it out, which gave me the front and back piece. I attached them together by using hot glue on the sides of the body close to the edge, starting about five inches down from the shoulder, leaving enough room for her arms, and stopping about eight inches up from the bottom point, leaving room for her wiggly feet and making it a bit easier for diaper changes.
 I made a triangle pattern and used it as my guide to cut out different colored "feathers", which I placed on the front of the body in my desired pattern and then hot glued them down.
 I love how the felt can hold it's shape. It made the feathers look a little ruffled.

I attached two pieces of velcro (one on each side) to the inside of the body on the shoulder line leaving more than enough room for her neck.

Finally, I cut out two wings in bright pink and attached them to the body.
For the owl head, I happened to come come across a brown knit hat that had two 'ears'...perfect! I just had to glue on eyes and a beak.


 My magazines are piling up. I like to go through them and tear out recipes, ideas, and pictures that may inspire future culinary, craft, gardening or decorating projects as well as pictures of houses or architectural details. What do I do with all of these pictures and pages that I tear out? Well, I put them in an idea book, of course.
 I bought large three ring binders with the clear pocket on the front and back.
 I used some vintage wallpaper from this great sample book I have to make the front and back covers of my binders.

Tear out those pages.

Lots of ideas and recipes to try...
 Place it in a clear page protector and put in in the appropriate notebook.

I have a book for:
Flowers, which includes arrangements and pictures of individual flower varieties.
Crafts and Living, which includes ideas for projects arranged by season as well as a section for home and garden.
Recipes. Book one. Breakfast and Desserts.
Recipes. Book two. Cocktails, soups, appetizers, vegetables and main dishes.
I also take pictures of things I have made or recipes that I have printed online or received from friends and file them away.

It's a great resource to have all of these ideas and recipes in one place.
When I need to be inspired I just flip through the pages!
When I found this organic cotton canvas at the fabric store I was really drawn to it's texture.

I though it would make a great bag.
 So I cut out my go-to easy bag pattern and started to put it together.

The pleats transform it from simple canvas market bag to something a little more.

For the lining I chose this deer print on bamboo fabric. ooh la la. how eco chic.


I like that the lining is a secret, sort of like pretty underwear.
 This bag wasn't complete without this woodland looking button. Perfect.

 I knew from the moment I saw this Glansa pendant lamp hanging in IKEA it would make a perfect mobile base. It is basically a wreath frame wired with little LED lights. Although it looked pretty cool hanging on its own above the crib I had a plan to sweeten it up.
 I found this great leaf ribbon at a local fabric shop. It has a matte paper-like finish. It reminded me of the Tord Boontje Midsummer Lamp. Yes, I could have just ordered one of those but it wouldn't have been as fun to make. Plus, I made those blue birds that needed a place to hang and be happy...

Step one. I covered the upper cords that the light hangs from with the leafy ribbon. Then I went around the frame of the light and then draped the last pieces randomly so there were 'vines' hanging down.

Step Two. I attached fishing line to my little blue birds and hung them around the frame at different lengths. Done!


My plan for a main wall in the baby's room was to use chalkboard paint. Not the traditional green or black, something different. I wanted orange. Of course I had a particular shade of orange in mind so the quarts of rustoleum in pre mixed quarts of colors was not going to work. I searched the internet looking for advice on blogs, reading magazine articles, even contemplated making my own using Martha Stewart's recipe, which would be quite a project. It was a big wall. I needed at least a half gallon and before you can use your home made chalkboard wall you have to cover the whole thing with chalk and then wipe it off. No thanks. That's not what I'm looking for.

Then I found Magnamagic. I ordered a gallon of their tintable chalkboard paint which they claimed could be be tinted any color you wanted. It was a neutral base paint. I later learned this meant that pastel colors were harder to achieve exactly but if you were looking for a stronger hue this would be perfect. And it is. $49.99 a gallon plus three day delivery and my creative dream was on its way to becoming a reality.
 I read on the Magnamagic web sight that a few select Sherman Williams stores on the east coast were now carrying their products. So that's where I decided to go to hoping that the bases of the paint would be similar and I could get a more exact color match. The staff at Sherman Williams was overly helpful. Although I left there a little uneasy about the dabble of paint on my gallon top thinking it was a bit brighter than I wanted I realized those people really know their stuff because the paint dried a bit darker on the wall and it was an exact match.
Top reasons to try this paint:
 After the paint dried I could begin the chalk drawing that I had envisioned for the nursery...


 What a happy room to be in.