rainbow rice {st.patrick's day style}

rice-header.jpg

Rainbow rice. An amazing sensory play project that I have been waiting to do with the little miss. I first saw it when I was pulling together ideas for her rainbow sprinkles birthday party. I wanted to wait and introduce it at a later time. I figured St. Patrick's day was a great time to learn about rainbows and leprechauns! And with the gray weather we've been having, I need to see rainbows now more than ever!

Originally, I imagined this as a super fun St. Patrick's Day party activity. Then I had a vision of two overly excited two-and-a-half-year-olds flailing rice all over my house and well, I chickened out!! I still made two boxes of rainbow rice, but the girls could enjoy them on their own. (I can hear my own mother laughing out loud right now.)

I started with a 25lb bag of rice. This was exactly enough for 8 cups of each color of the rainbow. Coloring the rice is very easy and I was surprised at just how fast it went.

rice1.jpg

I put the 8 cups of rice in a gallon size ziplock bag. Next, 1-2tbsp of alcohol, which helps set the color, and as many liquid food coloring drops as needed to achieve the color desired. I started with 25-30 and increased it from there. Seal the bag and toss the rice in the bag until the color is distributed. Easy as that. Empty the bag onto a cookie tray to dry.  The smell of the alcohol will go away as the rice dries.

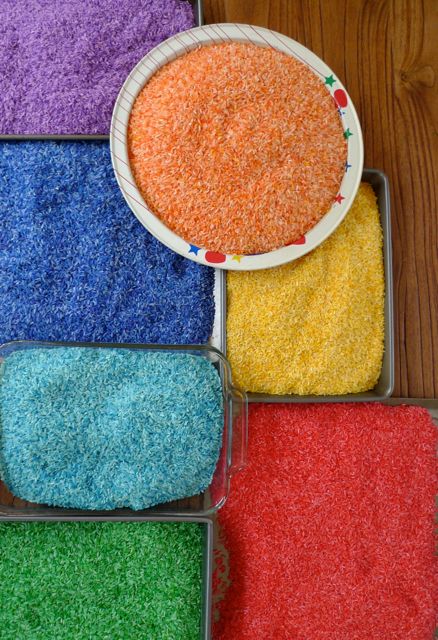
Now to fill the boxes! I wanted something big enough for enjoyable play with funnels, buckets, etc., but not too big, I decided on 28 quart clear boxes with lids for easy storage. They measure 23" x 16 1/4" x 6". It worked out PERFECTLY for the 28 cups of rice I put in it (4 cups for each of the 7 colors of the rainbow). Enough rice to play with and have fun, but not too much to overflow into the house. Totally ideal for toddler size!

rice4.jpg

As I put each color in, I would push it towards the last color to make each color about 4" in width. Doesn't it make you smile?

rice6.jpg

To introduce Clementine to the fun of St. Patrick's Day: leprechauns, rainbows, shamrocks, and a pot of gold, I bought some golden coins and glittery shamrocks to hide in the rice.

rice7.jpg

I hid 6 shamrocks and 12 coins in each box.

rice8.jpg

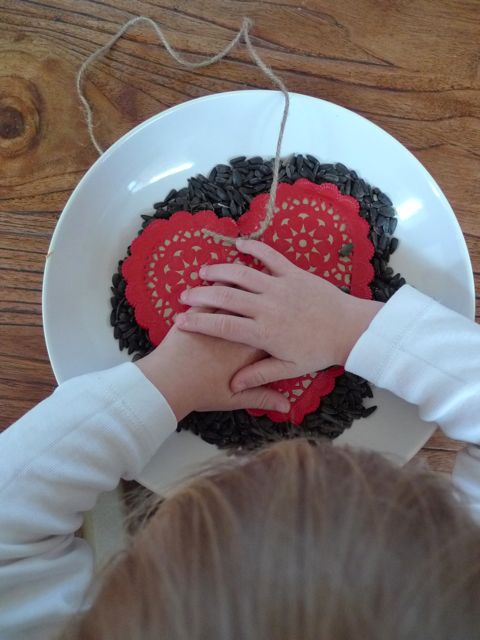
I simply pushed them into the rice. Buried treasure in the rainbow! I told her all about leprechauns and I read her a little Irish poem that I had found. We talked about how tall they were, what color they liked to wear, and about their mischievous ways. And of course how they say they like to hide their treasure at the end of the rainbow! Next came the colors of the rainbow (I went with the classic ROYGBIV, she'll have to learn it eventually, right?!) As much as she thought all of this was so cool, all she really wanted to do was get her little hands into that box of rice!

rice10.jpg
rice-colors-mixing.jpg
rice-coin.jpg

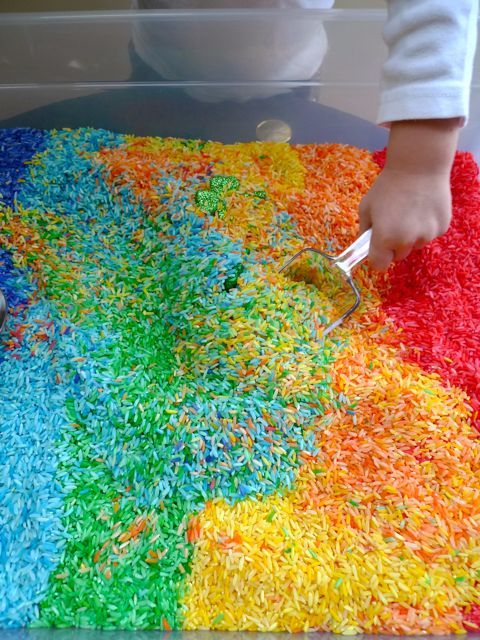
She was very excited to find the coins and shamrocks. When they were all found she played for a VERY long time. Yes! I love a successful project. Will I be finding rice all over my house forever? Probably. But, I think it's worth it.

This is what the box looks like now...

rice-rainbow.jpg

tiny succulent+glass votive+rocks & moss= smile

plant2.jpg
plant1.jpg

There once was a lady in need

of some sunshine, or just something green.

She found a little plant at the store,

brought it home, but realized it required something more-

the plastic pot was rather grim,

there must be something else to put it in.

No soil please, no larger pot,

she had to use what she had already got.

She glanced around the room and thought for a sec-

A votive, a few rocks, some moss, oh yes!

This would be easy, simple, and quick,

like a makeover magic trick!

The lady smiled, she is quite pleased.

I know this, of course, because the lady is me.

plant3.jpg

This is such a SIMPLE thing to do! And so inexpensive! So many possibilities: a simple gift for a friend/yourself/hostess, a windowsill, a mantle, a centerpiece, a party favor...

Oh, and might I also recommend Sharon Montrose's sweet photographs of animals in her book, Menagerie. Check out the Animal Print Shop! If only I had a bigger house and more walls. (Or was giving Clementine's room a makeover)

handprint masks for mardi gras

photo-13-1024x1024.jpg
photo-12-1024x1024.jpg
photo.jpg

A mask seemed like a perfect mardi gras activity for the little miss.

I showed her where New Orleans is on her favorite map puzzle. We listened to brass band music and talked about the festivities. She was super excited to get her beads in the traditional colors of purple (for justice), green (for faith), and gold (for power). We used these same colors to make our masks.

I traced her hands, one on purple paper, and one on yellow paper. I cut them out and glued them together at the palms and then to some cardboard (cereal box!) to make them a little sturdier. Next came the eye holes. The rest was up to Clementine. She glued feathers, drew with markers, and poured some gold glitter. It was a quick and enjoyable activity!

hand.jpg

I wound a gold pipe cleaner around a wooden skewer (with the point taken off) and taped it to the back of the mask. Lastly, three gold ribbons tied to the top.

Tonight we'll feast on jambalaya and king cake. Having an excuse to celebrate all sorts of holidays is definitely one of my favorite things about being a mom!

best friend pasta necklaces

NNN.jpg

Pasta necklaces are so fun! What makes them even better? (Pretend this question is being asked to a two and half year old girl obsessed with pink) Well, when the pasta is pink, of course! I thought it would make them even more special to have a "locket".

The girls LOVED this!!!

First off, coloring the pasta.

Put the pasta in a ziplock bag with a tablespoon of alcohol and 4+ drops off food coloring (depending on how dark you want your color, enriched pasta requires a few more drops of color). Shake it around until it is all coated. Place on tray to dry.

necklace-past-color.jpg
necklace-pasta-dry.jpg

Repeat this step for as many colors or types of pasta you want to use. Shoelaces make for the perfect string for the younger set. I cut one in half so each had the flugelbinder (yes, that is the name of the shoelace tip; impress your friends with that fun fact.) to use to ease in stringing the pasta. I tied a wagonwheel at the other end with a knot.

necklace-heart2.jpg

As for the locket, I cut a heart shape out of a sturdy piece of cardboard. For best results do not use corrugated cardboard as it bends too easily. I traced the heart shape onto pink paper and cut out three more hearts. One to cover the front, one to cover the back, and the third I glued just the top part down on the front, to make a sort of flap so you could "open" the locket. I punched a hole to string it on the necklace, and I glittered the sides to cover up the cardboard. After all was dry, I wrote "Best Friends" Lastly, I cut out pictures of the girls' faces. Two of each.

necklaces...1.jpg
vday-makingnecklce1.jpg
necklace-3.jpg

After the girls were done stringing, we tied a knot to make the necklace complete. Then we sat down with the pictures and a glue stick. We asked the girls to pick out the picture of their best friend, they did, and then picked out the picture of themselves. We glued the cute little faces under the flap, inside the "locket" and using a piece of sparkly pipe cleaner, attached it to their necklace.

necklace2.jpg

"Awww, so cuuute," Clementine said as she raced to see herself and her new homemade necklace in the mirror. Yes, indeed.

hearts and crafts: the very pink valentine celebration

vday-table-left2.jpg
vday-heart-cookies.jpg
vday-tableright.jpg
vday-necklace-supply.jpg
vday-lovebite3.jpg
vday-dress.jpg
vday-table-left-with-eggs.jpg
vday-puttingvalentinesin-frog.jpg
vday-hopping-like-frog.jpg
vday-pond.jpg
vdaycccc.jpg
vday-readingvalentines.jpg
vday-weez.jpg
vday-monket.jpg
vday-adshomemadev.jpg
vday-makingnecklce.jpg
vday.jpg
vday-.jpg

The little miss had her best friend, Addie, over for a pink valentine celebration. Pink cupcakes, candy, hearts, cookies, valentines, balloons, tissue paper flowers, even hard boiled eggs! There's a small part of me that hopes if I just bombard her with pink she will decide to rebel and like another color; until then, I put on my very pink, vintage, bedazzled dress and a big smile.

The valentines were placed in the froggy 'mailbox' that I had made out of a box, some green wrapping paper, and some extra large google eyes. Before the girls could open them, they had to hop like frogs on the hearts, jump or swim across the pond of bubble wrap (who can't resist popping those bubbles?!) and slither like a caterpillar or snake under the streamers. It was lots of fun. They did it quite a few times before opening their home made valentines and then about thirty more times after! They managed to squeeze in a few bites of their heart shaped pb&j's, munch on a few cookies, and lick the pink frosting off of a cupcake or two.

Then it was craft time. Pink pasta necklaces with a paper "locket" that I had written 'best friends' on. This was a big hit! After stringing the pasta, the girls pasted their pictures inside the heart. They loved it! Look how happy they are as they checked out their necklaces in the mirror. I love that pure joy!

Even weezie, our brussels griffon, had fun at the pink party. Although, I'm sure she's quite happy to have the bubble wrap pond off the floor today. Me too!

Details on the pasta necklaces and 'love bite' cookies to follow...

this valentine is for the birds!

bff.jpg

We really did enjoy watching the birds eat everything off of our ballerina birdfeeder. I wanted to incorporate that idea into a type of valentine. This is what I came up with!

We live far away from all of Clementine's grandparents and I thought this would be a fun surprise for them. (If you're reading this now, surprise, this will be arriving in your mailbox soon!) I thought we could go with the ol' " a little birdie told me..." phrase, which led me to this:

back.jpg

They are very easy to assemble, and even though it looks like a lot of steps, they go together super quick.

Here's what we used:

Red heart doilies (we used 6 inch)

cardboard (think shipping box, shoe box, cereal box, etc. really, just grab something from your recycling)

brown paper grocery bag (or any sort of kraft paper or construction paper will do)

glue stick (preferably a stronger bonding type)

twine

bird seed (we used straight oiled sunflower seeds. I liked how it looked all black, but any seed variety will work)

peanut butter and/or vegetable shortening (you can use either on its own or combine)

brown waxed sandwich bags or natural parchment

scissors and a hole punch

Start with one doily.

Using a pencil trace the heart shape onto a piece of cardboard.

Cut out the heart shape.  If you are making more than one bird feeder valentine, use this heart to trace others. Once those are done, set aside and get your brown bag or paper.

Trace your cardboard heart on the bag and cut out. Now it's time to assemble.

Cover the cardboard heart with glue. Place the doily on top.

Press down to secure.  Flip over.  The glue stick will remain a little tacky, so it would be best to work on a sheet of wax paper or parchment. Or you could let it dry completely before moving on. Repeat for the other side.

Glue the paper heart on top of the doily. If you used a box that has print on one side, choose that side to cover. This step is totally optional. I really just added it because even though the glue stick is non-toxic, I wasn't sure if the birds should be pecking at it and eating it.

Punch out a hole in the center top of heart.

Tie a piece of twine through the hole and knot it.

Spread the peanut butter or shortening over the paper heart as neatly as possible avoiding the doily.

Put the bird seed into a shallow bowl or pan.

This is where the little miss liked to help out. Press the peanut butter side down into the seeds. Turn over and use your hands to cover any spots that need it. Really press the seeds into the peanut butter.

Give it a shake so that the extra seeds that didn't attach fall off. Done! When it is hung from a tree it will be birdseed on one side and a red heart on the other.

Place in the freezer to set while you clean up and get the packaging together. This is not a necessary step, of course, you could skip ahead to packaging. Since we have to mail these I thought it would make packaging them up a bit of a neater process.

Place bird feeder valentine in a brown, waxed paper sandwich bag.  I, unfortunately, was all out and wanted to make use of what I had on hand, so I made envelopes out of natural parchment. Wrapping them up like present in waxed or parchment paper will work as well.

Maybe you can think up your own fun saying, we used "Let the little birdies come tell you how much I love you!"  That seemed appropriate for a toddler to say to her grandmas, but after I had some time to think about it (that would be post-Clementine bed time) I came up with this:

"The birdies will come from miles away to tell you you're loved and missed this Valentine's Day!"  I always like a rhyme.

OR, say you were making these to give to a child you could say:

Hang me up and you will see the little birdies come to me.

Listen as they say, "Tweet, Tweet. Be my valentine, you're so sweet!"

I know Clementine LOVED watching the birds! (I'm not saying she wouldn't prefer something of the sweeter, say edible, variety but she would definitely enjoy this in addition.)

There are so many ways to package it up. You could just use twine and go with a simple natural look, or think like a two year old who said, "pink, mama, pink!"

Anyway you wrap it up, it's still a different approach on a classic doily valentine and the birds will love you for it too!

tissue paper heart garland

heart7.jpg

It was time to take down the snowflakes and start thinking about valentine decorations. Last year's were all tangled in a box. I needed something new.

I recalled heart garland that I had seen on etsy made of felt. I like that idea, but it seemed a little heavy. Tissue paper was my answer.

Seriously, this is such an EASY project! If you can sew a straight stich on your machine you're good to go. It took me longer to hang these up than it did to make them!

Here's what I did:

heart1.jpg

I picked up some sparkly pink tissue paper from the dollar store, made a heart shape out of sturdy paper, stacked up my tissue paper, traced my heart and cut.

heart2.jpg

I stitched the tissue paper hearts together at the widest part for the most support, and left a little space in between in each heart.

heart3.jpg

The tissue paper is much stronger than you think. I love how light and delicate it looks when hung. It glows in the sunlight and if you can find the sparkle paper it has a great subtle glimmer!

heart4.jpg